Build the GTA 6 Logo in Rive: a City That Drives Inside the Letters
What do GTA and Disney have in common?
GTA VI just came out, and what caught my eye wasn't the gameplay. It was the opening: shape after shape, each with a whole world moving inside it in parallax. It's a trick Disney built a 14-foot camera for in 1937.
So I rebuilt it in Rive as a homage to the logo, with Vice City driving inside the letters.
All of that movement is 2 keyframes. The palms rush past, the hotels slide by slower, and the skyline barely moves, and it all comes from one animation on one empty group.
The one idea
One animation moves a camera, and every layer follows it at its own strength.
Things close to you move fast, things far away move slowly. That difference is what makes a flat picture feel deep. It's called parallax, and it's an effect I keep coming back to because it fakes depth so well. Here it feels like you're riding a speedboat along the coast of Vice City.
The art: Claude and Weave
I made all the art in Weave, Figma's tool for generating images and video with all the leading models in one place. But I didn't work in it directly. I created a Weave account, connected Claude to it, and Claude ran Weave for me. I described what I wanted, and Claude wrote the prompts and ran the generations.
If you want to set it up yourself:
- Open a Weave account at weave.figma.com and link it to your Figma account.
- Pick a paid Weave plan. Claude can only reach Weave on a paid plan.
- In Claude, add the Figma connector and sign in with the same Figma account.
That's it. Now Claude can see the Weave models and run generations for you. I used Nano Banana 2 for all the layers.
I started with one concept image of the city at sunset, and then asked for every layer on its own: the skyline, the hotels, the water and the palms.
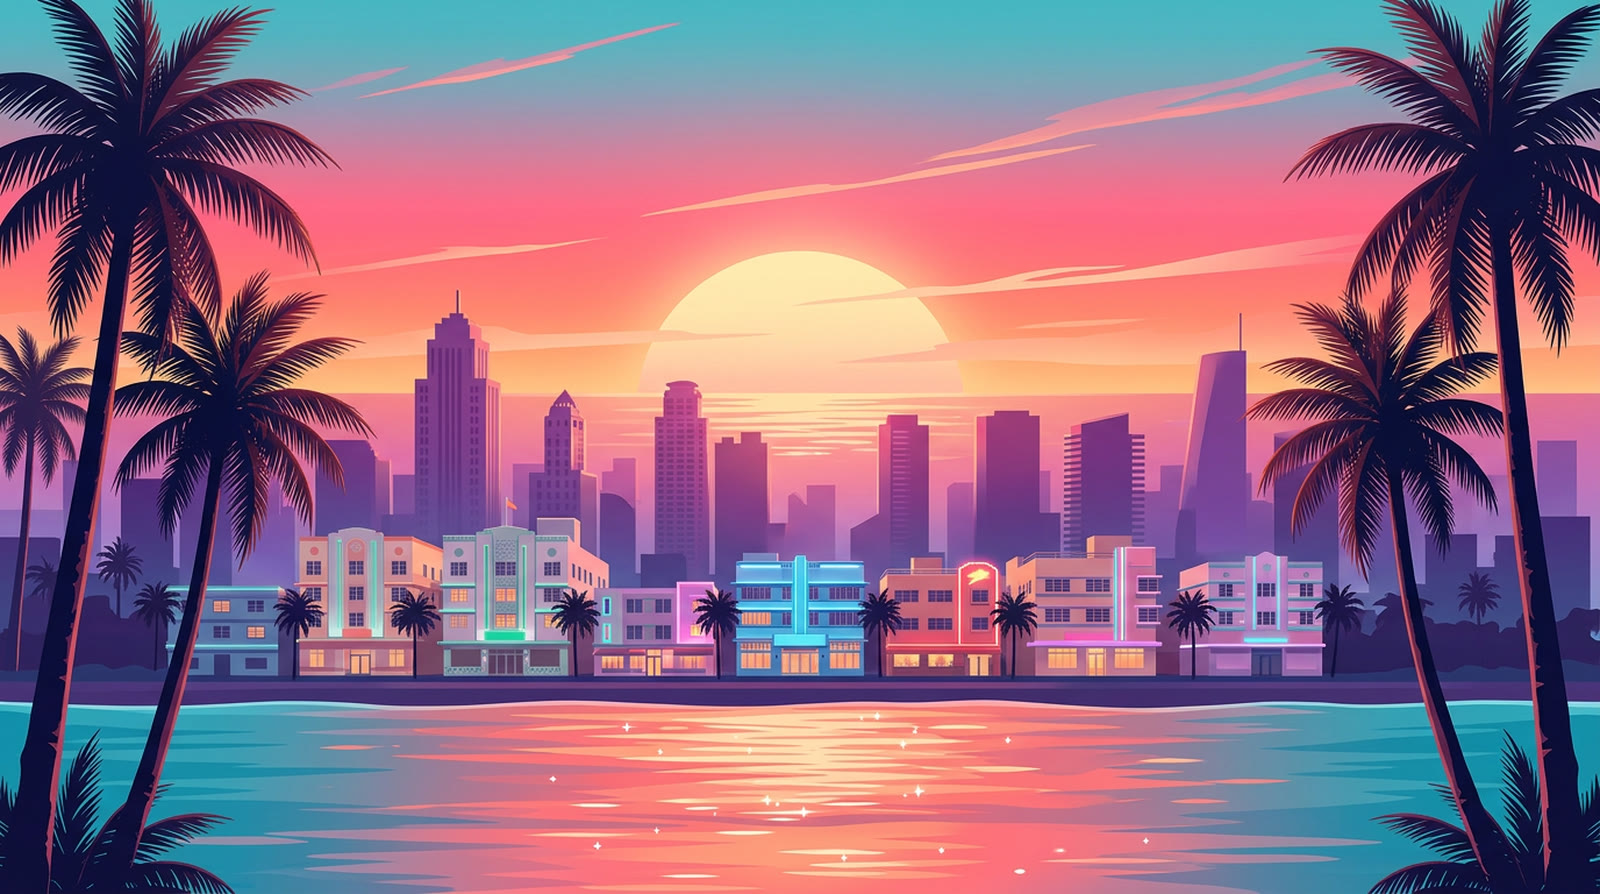
Each layer was generated on a flat background colour, and Claude removed the background, just like a green screen. The hotels are the exception: I used green there and not magenta, because the neon on the buildings is pink and it would have been removed with the background.
One thing I asked for on purpose: every layer is 4800 x 1500. That's the height of the scene and twice its width. Agree on the sizes up front and everything lines up when you bring it into Rive.
The exact prompts I used are in the starter kit at the end.
Bring the layers into Rive
Create an Artboard called Vice City, 2400 x 1500, and drag the five images in, stacked from back to front: sky, skyline, hotels, water, palms.
Now move them all to the left and you hit the problem right away: after two images' worth of travel, there's nothing left to drive into.
Endless layers: Image fill with Wrap
Instead of using an image as an image, we use it as the fill of a shape. Then Rive can repeat it as far as we need.
- Turn off the Artboard's Clip so you can see the whole layer, also outside the frame.
- Draw a Rectangle. In its Fill, switch the colour to Image and pick the layer.
- Stretch the Rectangle and the image stretches with it. We don't want that. Set Size to Original and the image keeps its own size.
- Set Wrap X to Repeat. Now the image repeats along the whole Rectangle.
- Make the Rectangle 12000 x 1500, long enough for the whole drive.
For the palms, Repeat is all you need. There are gaps between the trees, so you never see the join.
The water is different. On Repeat you see a jump at every join, because the right edge of the image doesn't match the left edge. Switch it to Mirror: now every join meets its own reflection, and the jump is gone. Yes, it repeats a little, but while it moves your eye doesn't notice.
The hotels and the skyline are built the same way.
The sky is the exception. It barely moves, so a smaller Rectangle with the sky image and no Wrap is enough. Move it up a little on Y to show the sun. Repeat it and you'd get two suns.
If you want a real Repeat with no mirroring, ask for it when you generate the layer: "seamless and horizontally tileable: the left edge continues exactly where the right edge ends".
One thing to watch: the layer that moves the most shows the most of its image, so that's where you'll spot a repeat first. If it bothers you, generate the front layer wider.
The camera: an empty group and 2 keyframes
Turn the Clip back on. If we move all the layers together, it looks flat. We want all of them to move the same way, but not by the same amount.
So we make a camera:
- Add an empty Group, name it
Camera, and put it in the center of the Artboard: x 1200, y 750. - Create a timeline called
Drive, 8 seconds long. - Key Camera's X: 1200 at the start, -4800 at the end.
- Set the loop to Ping-pong so it drives there and back, and give it a gentle ease in and out, like a real camera starting to move.
Play it and nothing moves. That's right: the camera is an empty group. Now we connect the city to it.
Every layer follows the camera at its own strength
On each layer, add a Translation Constraint with Target set to Camera. Turn on Offset, so the layer stays where you placed it instead of jumping to the camera.
With every Strength at 100%, the whole city moves together and it looks flat. The depth comes from the Strength:
Rive Masterclass + Rive Scripting
Master Rive for real products.
Get Both for $219Both courses for $219. Save $49.

Rive Masterclass + Rive Scripting
Master Rive for real products.
Both courses for $219. Save $49.
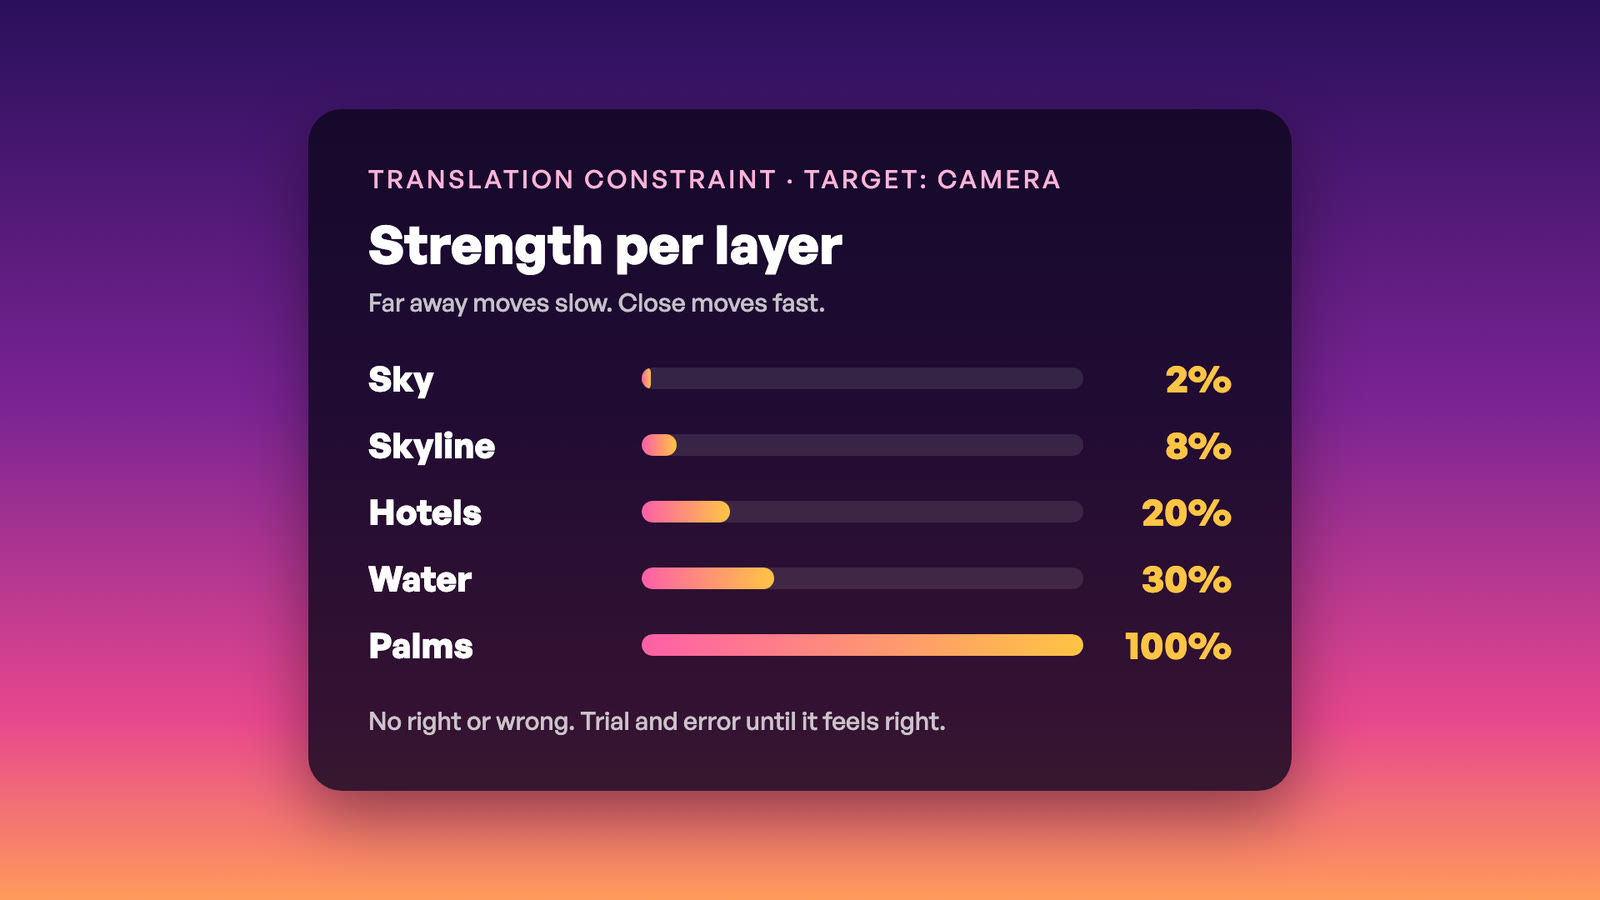
- Sky: 2%
- Skyline: 8%
- Hotels: 20%
- Water: 30%
- Palms: 100%
There's no right or wrong here. It's trial and error until it feels good.
A tip that will save you time: set the Strength before you pick the Target. In the video I changed the Strength after the constraint was already set, and the palms jumped off screen. In Animate mode it can even add keyframes you didn't ask for. The order that works: Offset on, Strength, then Target. If a layer already jumped, delete the constraint, put the layer back and add it again.
Play it. Two keyframes, a different strength on every layer, and the whole city drives.
And here's the part I like most: the speed and the distance live in one place. Want a longer drive, or a faster one? Move the second keyframe, and every layer follows.
Disney did this in the 1930s
Back to Disney. In the 1930s they used the Multiplane Camera: flat painted layers on glass, each at a different distance from the camera. When the camera moved, every layer slid at a different speed, and a flat painting got depth. That's exactly what we built here, with an empty group and constraints instead of sheets of glass.
One colour for the whole city
Every layer was generated separately, so the colours don't always match. One layer on top of all of them fixes that.
In Vice City, draw a Rectangle the size of the screen, 2400 x 1500, above all the layers, and call it Color Grade. Give it a Linear gradient from top to bottom, like a sunset sky: #3D4BD8, #B43CC8, #FF4F9A, #FF9A3D.
Now set its Blend mode to Color and its Opacity to 60%.
It doesn't hide anything, it only recolours what's under it, and suddenly the whole city looks like one picture at one time of day. It isn't connected to the camera, so it stays still while the city drives under it.
Put the city inside the letters
Go to the Main Artboard. The VI in the starter file is made of Shapes, close to the original logo, with a Stroke around it. That's a plus: it works with any shape, and if you change the shape, the strokes follow.
Select the letters' pink Fill and change it from Solid. This time, instead of Image, pick the new option, Artboard.
You'll probably notice Vice City isn't in the list. Artboard paint only lists Artboards that are set as Components. Turn that on for Vice City, come back, and pick it.
Play it and the city is inside the letters, but it isn't moving. That's the second catch: Artboard paint plays the Artboard's State Machine, not its timelines. Vice City didn't have one. Add a State Machine to it, put Drive on Entry, go back to Main, and the city drives inside the VI.
This is my favourite part: the fill itself is an animation. There's nothing else to do.
A colour that runs around the edge
The outline has an edge layer with an Angular gradient. Add a timeline called Gradient Spin, 6 seconds, rotate the gradient from 0 to 360, and loop it. Now the colour runs around the letters all the time, like neon. Add it as a new layer in the State Machine so it plays with the rest.
The starter file also has a very slow scale on the logo (100% to 108% over 10 seconds, ping-pong) and a glow that breathes. They're already built.
Bonus: live text with Data Binding
In the final file there's one more Artboard, Live Text. Same city, same fill, but on real text, bound with Data Binding to a title property. I asked Claude to do that wiring.
Change the text in the Data panel from VI to RIVE and it just works. The city keeps driving inside the new word.
Claude's version vs mine
The truth is, at first I asked Claude to build this whole effect on its own, through the Rive CLI. And the Rive CLI has changed the way I work.
But AI goes for speed. Claude's version worked, and it was ready fast, but the structure wasn't clean: every layer a different size, an odd scale on each one, and keyframes on every layer separately.
| Claude, first try | Built by hand | |
|---|---|---|
| Animation | Keyframes on every layer | 2 keyframes on one empty Camera group |
| Layer size | Every layer a different size | Every layer 4800 x 1500 |
| Scale | Scale X 73%, 76%, 83%, sky at 258% | No scaling |
| Depth | Built into each layer's own keyframes | One Strength per layer: 2, 8, 20, 30, 100 |
| Change the speed | Edit every layer | Move one keyframe |
So I rebuilt it myself with one rule: every layer the same size, one camera, and a different strength per layer. That's the whole point. Not only that it works, but that it's simple, easy to change, and someone else can open it and understand it.
Go further
Building files the right way, step by step, with constraints, timelines, State Machines and Data Binding, is what we do in the Rive Masterclass.
If you like parallax, the Rive Scripting course has a lot more of it, like flying through space in 3D.
Get the starter file
The kit has the starter file with the logo ready on Main, the five layers, and the prompts I used for the art, so you only build the drive and the trick.
Download the GTA VI Logo Starter Kit
The starter kit from the GTA VI logo tutorial: the Rive file with the VI logo ready on Main, the five city layers (sky, skyline, hotels, water, palms) at 4800 x 1500, and the prompts I used to generate them with Claude and Weave. Build the drive, the constraints and the Artboard paint along with the video. Fan-made, not affiliated with Rockstar Games.
Fan-made, not affiliated with Rockstar Games.
Get more Rive tips
Weekly tutorials, new lessons, and Rive community highlights — no spam.